Showing posts with label Decor. Show all posts
1

Playing Hard to Get

Posted by Corrie on 10:26 PM in ,
I have a confession to make. I'm in love.

With Darren...yes. But there is another.

This week, I began an unhealthy love affair with Chaing Mai.


I know...Chaing Mai is a little crazy. And has been around the block a few times - for a few years in fact. But I just can't resist.

Courtesy of The Desk of Annie

Courtesy of Caitlin Wilson Design

So complex. So much personality. It was love at first sight.

Courtesy of Yay Decor
Couldn't you just see it making a home as a pillow on my couch?


The seemingly random pattern that's so easy to pair with other patterns. That perfect mix of colors found throughout my house. The piece de resistance of my entire first floor. Oh, the places you'll it'll go!

 Oh, the drama.

.:Sigh:. But I forgot to mention a minor little detail. This is only a visual love affair for now, because I ain't no sugar momma. Think $140 per yard. Ouch.  On top of the price, it's a designer fabric made by Schumacher (whose fabrics I'm obsessed with, by the way) so it's playing hard to get. I've searched Ebay and Etsy but with nothing very reasonable to be found. The best I could find was a pair of pillows made with the fabric (only on one side) for $100. Still way out of my meager DIY budget. And there's nothing comparable that satisfies me.

Soooo for now I suppose I am left to dream. And keep stalking Ebay. And Etsy. And maybe save my pennies. And maybe make some calls to some local fabric/upholstery places to see if they might have any remnants.

And, hey! Any of you out there! Can you help a sister out? Do you or anyone you know have any scraps of this fabric they would be willing to part with? Any idea where I might find some at a bargain price? Chaing Mai in aquamarine. The bane of my existence right now. (Pathetic to say about a piece of fabric, I know. But gosh does it seem so fitting for my house.)

In the meantime, I'm going to focus on finding some orange curtains. Yep, orange. And picking a paint color so we can get our bedroom makeover. It's about to get crazy in here, kids.


25

DIY Typography Art

Posted by Corrie on 9:19 AM in , ,
Happy Wednesday! If you remember from Monday, among the pumpkin carving shenanigans in my Halloween post, I let you all in on a little preview of my latest DIY project. In case you missed it, I made a personalized, typographic art print for Darren's niece/my goddaughter, Olivia, who was celebrating her first birthday this past weekend. Her mom had made a specific gift request, but since I like to give homemade gifts, I thought I would supplement the requested gift with something else. Of course, I turned to my favorite inspiration-inducing culprit, Pintrest, to get some ideas. If you're a frequent reader of this blog (do any actually exist?), you might remember this Pottery Barn 'pinspired' home decor project awhile back. We interrupt this program for a brief announcement.

If you haven't yet discovered Pintrest, you don't know what you're missing. It's like the preferred drug of eye-candy oglers and bookmarking fanatics. I'm addicted, on it until the wee hours, and it makes me feel warm and fuzzy inside...only instead of just saying no, I say heck yes every time. And it's legal.

There. I'm done. Sorry for the bordering-on-creepy analogy. Back to business.

There were tons of adorable (and DIY-able) baby items and projects I was finding, but for some reason, the personalized art was really striking a chord with me. I think what I liked most about the art was that many of the prints could be appreciated by Olivia for years to come, versus clothes and accessories, which she would quickly outgrow. These were a couple of my favorite finds.

                                                                              Source: etsy.com via Corrie on Pinterest

  Source: etsy.com via Corrie on Pinterest

I loved how the first print colorfully emphasizes "I love you" within the alphabet, while the second was more personalized with a name and initial.  Apart from all other practical and baby-gift-related reasons, I think that typography is pretty much the bees knees (does anyone even use that phrase anymore?). Plus it seemed like something my graphic-arts-rookie self could tackle. Double win. For some reason, seeing the "I love you" print reminded me of Robert Indiana's iconic LOVE screen print.

Photo courtesy of www.moma.org
And...woop there it is was. My inspiration (or perhaps 'pinspiration,' thanks to Pintrest's influence). I could do my own take on Indiana's print, personalizing the 'O' with Olivia's name repeated in different fonts and sizes like the 'E' print above. Since I didn't have a plain template to work from, knew I would likely need to make a lot of text boxes, and assumed I would want to have a lot of control over placement, color etc., I knew Microsoft Publisher wasn't going to cut it. However, I don't have Photoshop or Illustrator (I'm too poor to invest the money into buying those programs considering the little bit of design stuff I like to pretend I can do), so I jumped into my ghetto fabulous free version of Gimp, a Photoshop program wannabe.                


From there, I opened a blank 8.5"x11" 'image,' found a serif font that looked like the one in Indiana's print, and created a separate text box for each giant letter. I rotated the 'O' and changed the font color to a shade of grey so that I could use it as an outline over which to place the text boxes. 


Next mission: create many, many text boxes. I wanted one of Olivia's names to stand out more than the others, so I made that as the first layer in a nice scripted font. Then, like a mad woman, I continued creating 'Olivia' text box layers in all sizes and fonts. Some were all lower case, some all upper case, and some in the traditional proper noun way, but I tried to vary them to keep it interesting. It really started filling in, as you can see in the up-close-and-personal screen shot below.


Some of the small spaces were getting hard to fill in, but I tried not to let them bother me too much. In fact, I saved a number of them for last, since it was hard to find fonts that I could make small enough to fit, but would still be legible. Once everything was filled in, I removed the original 'O.'  


I was so excited about how it turned out that I got off the couch and did an Ellen-esque dance. Only substitute the cheering audience and President Obama with an unfazed Darren at the other end of the couch (my spontaneous bursts of dancing no longer surprise him). 


Somewhere between finishing the 'O' and busting a move in my living room, I came to the realization that I could do the same design with the 'V,' which couldn't be more perfect since Olivia's last name is Vaughan.  (The excitement probably only enhanced my dance moves.) So I immediately got to work on it in the same way I started the 'O' - by greying out the letter 'V', creating a large focal point word in the same font as the one in the 'O,' and throwing in text box layers. It was starting to look like The Sorcerer's Apprentice up in this place, only with multiplying text layers instead of brooms.


The skinny, right side of the 'V' was a bit challenging because the fonts had to be so small to fit. I didn't want them all the same size, so I made some of the words vertical or broken into two lines. 


When all was said and done, I removed the original, grey 'V.'


I was really happy with how it came out, but it needed some color. Her room has light blue and light green paint colors, so I considered coordinating the print. However, I also thought about using colors that would be more timeless (less pastel/baby-ish) in hopes that Olivia would still enjoy her art as she grows older and into more mature room decor. 


Ultimately, I decided that the green and blue looked too washed out. The black and rose were a bit more sophisticated, plus the pink color of the focal words drew attention to her full name within the initials. 


A smidge of color and 230 text layers later, I was done. Since Olivia's room doesn't currently have anything on the walls except a tree and Winnie the Pooh mural in the far corner (I knew this from little a reconnaissance mission I did last time I was at their house), I wanted to make sure the print was a fairly large size. I found a 12" square frame with an 8" mat, which I thought would be the perfect size - big enough to read the print and square to fit the shape of the text. Plus it was on sale for 50% off at Michael's. Boo-yah. I had some leftover 110lb card stock leftover from doing the programs for Rachel's wedding, so I took some of it to Office Max to have my art printed. It came out really nice (though I might try matte photo paper next time just to see what the difference is). I just barely had enough time to frame and wrap it before the party, so I didn't have time to take a picture. Jamie (Olivia's mom) had to send me one from her phone later. 


It seemed that a lot of people at the party liked it, and one of my friends even suggested that I try selling other customized versions on Etsy. What do you guys think? Would you be interested in something like this, either with a child's first and last name or a whole family's first names and last name? Now that I have a 'template,' I wonder how long it would take me to make a new version. Regardless, I hope it has inspired you to try your own typography art. It really was quite simple...just time consuming!...but with a fun result.

Since Pintrest was a big part of my inspiration for this project, I've decided to link this post up as part of the fall Pintrest Challege, hosted by the lovely and always inspiring ladies at Young House Love, Bower Power, Ana White and House of Earnest. (I participated in their summer challenge here.) I could only dream of aspiring to their level of blogging greatness and general DIY coolness. 


As well as a couple of other link 'parties':

Good Life WednesdaysPhotobucket
As always, I would love to hear your feedback! Do you have any cool typography prints in your house? Do you think this project has Etsy potential? 

2

Halloween Decorations & Printables

Posted by Corrie on 6:58 PM in , ,
It's fall ya'll! And boy has October come in with a bang. Here in Cleveland it was a rainy, windy, miserably cold weekend. Who am I kidding...that pretty much sums up the past two weeks. Regardless, I used this gross-weather-weekend as a good opportunity to put in some overtime at work, cook up some potato leek soup, and then bust out the Halloween decorations! The start of October officially means Halloween in my book, and as one of my favorite holidays - a close second only to Christmas - I wanted to get the decorations up asap. (Darren has been asking "When are you going to put up the fall decorations?" for about 2 weeks now, so I guess 'asap' might not be the right description...) Plus, I saw that one of my favorite blogs, The Lettered Cottage, was hosting a fall link party, so I thought it would be fun to participate. You know how I need extra motivation sometimes. (If you want to see what a REAL blog looks like, check out Layla and Kevin over on The Lettered Cottage. Not only do awesome house projects, but they have some mad photography skills. Their talent puts me to shame.)

The Lettered Cottage

Anyway, I got D to bring down my one and lonely only box of halloween decorations from the attic. Some people like cute little pumpkins and scarecrows as decorations around Halloween time, which can be fun and kid-friendly. But Darren and I? No sir. Our objective is to scare the crap out of kids. We hope to one day win the Lifetime Achievement Award for Halloween Scariness (if one ever existed) by gradually turning our place into the creepiest haunted house on this side of the Cuyahoga. I emphasize gradually because, honestly, do you know how easy it is to blow all of your money on Halloween decorations? That ish is expensive. Which is why we try to buy decorations AFTER Halloween when it all goes on clearance. But what fun is buying decorations after Halloween when you're soooo excited to decorate now? It's not. Which is why I try to find DIY projects and other things around the house that I can use to make me feel like I have something new to put up. Such is the life of cheap frugal new homeowners.

After I pulled everything out of the box, I realized I only had enough decorations to really do the mantel and the dining room table. Kind of lame, but I'll take it for now. I started with 5 kraft paper skulls, which I coffee stained last fall to make them look old and textured; a creepy, furry rat; a bust statue of a vampire we picked up on clearance a few years ago; some candles; and a spider I also made last fall by painting styrofoam balls and attaching black wire for legs.


When we were up in the attic looking for the Halloween box, I spotted some grey corbels my mom gave me awhile ago for a future unknown project and thought they might work as candle 'holders.' I threw them up on either side of the mirror and scattered some plain candles I already had.


Since everything was kind of small-scale and spaced out across the mantel, it looked pretty empty. On an experimental whim, I grabbed a yard of burlap and a roll of fall colored ribbon I've had sitting among my craft stuff for close to a year. The burlap acted as a nice base to anchor all the small items, and the ribbon created a nice colorful 'flow' between all of the objects.


Ahh. Better. It sort of came together in a forced and collected-from-all-over-the-house kind of way. You could call it something from nothing I guess.


Despite my best efforts to arrange things at different heights, the mirror still looked really plain. It is pretty huge, after all. (That's what she said.) I decided to make some sort of banner to drape over it to break up the space a bit. Since I was in my pajamas didn't feel like running to the store, I looked around the internet and my house for some more supplies to throw something together. I figured twine would be a nice rustic replacement for string and found this guy from Women's Day via a Google image search:


I liked that they used newspaper as the background and decided to do something similar, but with newspaper as the foreground and triangle letters instead, a la the bunting on this wreath over at Pretty Ditty:


She had a printable PDF, but since our printer is out of ink, that wasn't going to work. Newspaper is pretty thin, so I figured I would pull up a cool font on my computer and trace over it on the newspaper. Kind of like a shoddy light box of sorts. First, I wanted to figure out how wide to make the triangles so I could adjust the font size on my computer to match. To come up with the triangle size, I determined the length of twine I wanted by draping it over the mirror and cutting it - 40 inches. Since I wanted my banner to spell "beware," which is 6 letters, I decided that 5 inches wide would be enough for each letter to take up space. This allowed for extra width to account for black paper backing behind the newspaper, but not wide enough to look crowded hanging from the twine. This is all very technical, can you tell? I pretty much eyeballed it. I wanted my triangles longer than wide, so I randomly chose 7 inches as the length of each side. Then, I made a template on some white paper (click here for a PDF version) and traced six triangles on non-color, print only sections of the newspaper.


After cutting out the triangles, I found a font I liked on my computer - QuentinCaps - and enlarged it. Holding a triangle up to the screen, I enlarged the font to a size I liked. My 'light box' idea worked really well and I could see the letter perfectly through the newspaper. Using a pencil, I traced over one letter per triangle, shading in the dark areas. I just carefully held the newspaper against the screen instead of taping it, because I was worried about the tape ruining my screen (and not tearing the newspaper upon removal).


Then I colored the letters in with a black sharpie.


When all was said and done, I had these:


All that was left to do was glue them to some black scrapbook paper, cut them out leaving about 1/4" border (eyeballing it of course), poke two holes in the top of each triangle and string the twine through. Clearly it would've been much quicker to just print the letters onto the newspaper, but I made do with what I had.

Ahh, much better. It makes good use use of the empty space, and it adds a nice spooky touch to the decorations....And it was free. I love free. And here's the whole shebang:


Pardon the glare in the first pic and the terrible quality of the second. I took the pictures at night and we have terrible lighting in our living room.

One other quick project I did was to make these mice silhouettes from Martha Stewart to put on our stairs and baseboard (picture courtesy of Martha...my mice aren't up yet).


She made hers out of paper, but if I was going to spend all sorts of time cutting out mice, you can bet your cajones I didn't want something flimsy that would be destroyed in a few weeks, only for me to make them all over again next year. So, I made mine from black craft foam that I had bought last fall. The stuff is super cheap and way more durable than paper.


 I printed out the mice templates (which you can get here) and traced them with pen onto the foam.


Cue some crazy cutting skills while watching TV and I ended up with these guys.


Plus a whole bunch more, some of which I still need to cut out.

So, that sums up some of our Halloween stuff this year for a total cost of maybe $2 worth of black craft foam (which I already had, so technically it was free.) Plus, reusing the newspaper also made my project kind of 'green,' which always gives us the warm-and-fuzzies. Hopefully this has inspired you to look through your house for some things you could repurpose as decorations (extra fabric perhaps?), and if anything, at least you can use the free printables if you're feeling a little artsy fartsy. Here are the links to them again:

A PDF version of my 'Beware' banner 
Martha Stewart's silhouette mice
Pretty Ditty's Halloween bunting

Are there any fun Halloween projects you're making this year? Maybe a costume or some creepy decorations? Or maybe you're more into the fall harvest stuff, which is nice because it lasts through Thanksgiving. Let's hear all about it! 

Happy Haunting!

0

Antiques Roadshow

Posted by Corrie on 11:15 PM in
This isn't your standard doing-things-around-the-house post, but I wanted to share with you a little adventure I went on last weekend that resulted in a couple of fun finds for the house. This past Saturday, I made the drive out to Burton, OH, picking up my mom along the way, for the Burton Antiques Festival. Perhaps you could call it my own little Antiques Roadshow adventure (more like 'Antiques Roadtrip'...or maybe 'Antiques Fair-show'...eh, you get the point). Do you guys ever watch that show? I feel like a lot of people have but are embarrassed to admit it, like it's something only people 60+ years old would watch. Well, I'm not afraid to admit that Darren and I both watch it on occasion and appreciate it. I mean, really. There's some crazy ish that can go down on that show. Side note - did you know there's an Antiques Roadshow computer game? I'm not exactly sure I understand how it works, but the fact that it exists makes me laugh.

Enough of my random tangents, let's get to the goods.

The Burton Antiques Festival is held outdoors at the Geauga County fairground twice a year - one Saturday in June and one Saturday in September. There are about 400 vendors that attend and it's only $6 to get in (with free parking). My mom has been going for years with a friend from Pennsylvania, but I always seem to either find out about it last minute or have conflicting plans. This time, I got the September date from her after the June show and marked it on my calendar to make sure I wouldn't miss it. And believe me, if you are at all interested in antiques or turning old things into new, you NEED to check out this festival. There is literally something for everyone. From 19th century farmhouse items to Art Deco decor to vintage toys to antique hardware to furniture...the list goes on. You'll feel the need to stop and look at every. single. thing. from every. single. vendor., but if you do, you'll be there the whole day and there will be about a 99% chance that anything you thought "oh, I'll come back for that later" will be gone. In the time I saw a fireplace ash bucket and turned to my mom to say, "That might make for great wood storage in front of my fireplace," some girl had picked it up before I could even get to the word "wood." Since the whole experience was a fun adventure, I thought I would share the things I picked up, along with some interesting-but-not-worth-spending-the-money-on finds. So if you only care about that latter, you might want to scroll down a bit.

I walked into the festival with a list of items I was hoping to find for the house/future projects, so that helped me stay a bit focused. Some of those things were: old soda crates to hang as shelves, some sort of wooden or wire bins for floor storage in the future pantry, an old desk or vanity to replace my dresser in our bedroom, and a kitchen scale. I was also hoping to scope out some old coffee grinders and vintage fans, even though I didn't really plan on buying them that day. Just kind of price checking for future bartering purposes, ya know?

A number of vendors were selling soda crates, and I ended up grabbing an old Pepsi one for about $10, which was low to average for what vendors were asking. I also quickly noticed these really cool, wooden, compartmentalized containers, some of which were described as knife trays, that a lot of vendors were selling. I thought they would be a great storage 'centerpiece' for our coffee table, where we could put remotes, a paper pad and pens, and other miscellaneous things, all which would be easy to remove if we needed the table space. What wasn't so nice was the price tag on most of them - $70-$200!  Since they seemed to be everywhere, I kept price checking and came across one that I bargained down to $20 because one of the compartment separators wasn't completely secured into place. Here's a pic of it being put to use in its new home:


Unfortunately, I later came upon an almost identical one in a really awesome blue color that had nice wear...ALSO for $20! I definitely would've preferred the blue one, which would've gone better with the living  room color scheme I'm trying to put together, but there's no way I could've known I would find another at such a cheap price. And if I wouldn't have bought the one I did, it probably would have been taken by the time I came back to it. Alas, the downfall of buying antiques is that you can't return them. I thought maybe the girl would want to swap me for her cooler one, but I'm pretty sure she was trying to sell things...not barter. Wishful thinking. I'm still happy with my purchase though, and it's definitely functional.

A few fun and random things I found were some really old wooden baby blocks. Each had a carved letter on it along with other printed letters and images of animals. They were worn, but really cool looking. I picked up a 'C' block and a 'D' block for my and Darren's initials. Then, one of the last booths I came across had a HUGE collection of antique printing blocks. I have to tell you, I'm obsessed with these. I just think they are so cool looking, especially in such a large group with all different sized letters:


When I was a kid, my mom actually gave me an old printer's box to use as a shadow box, and I intend on hanging it in our house at some point. To add to my collection of letters (which really only include the letters in my name), I picked up an ampersand, thinking I could eventually display it with my C & D blocks in the printer's box.


I did buy one last thing. The best for last. When you see it, you might think I'm crazy for being so excited over something that appears to be not that big of a deal, but truthfully, I AM a little crazy so you are probably right. It's a lamp. On my second time browsing through the vendors, I realized that I had somehow missed a vendor with a bunch of old vintage industrial lamp shades, electrical parts and hardware. Something caught my eye and I wandered over. Right as I picked an item up to show my mom, I spotted it. My beautiful desk lamp. SHUT THE FRONT DOOR. It was the same style I had been drooling over in Restoration Hardware and Pottery Barn catalogs for almost a year (those are reproductions of course).  I went running over and grabbed it. It is gold. My second least favorite color (next to pink), but I didn't even care. The wire cord appeared to be in excellent condition with the original plug. I asked the guy how much and I could've sworn he said $40. I rushed over to see what my mom thought - even though I had already subliminally decided to buy it - and told her maybe I could work him down to $30 since he said he didn't know if it worked. He had never plugged it in. He must've overheard me because as I walked back over to him he shook his head and said it was a firm $40 because he was asking $75. I didn't ever remember hearing $75, but I figured $40 was worth it even if I had to rewire it. After all, the reproduction lamps I had been looking at were around $100, which I clearly wasn't going to spend. So, I figured it was still a deal, gold color and all.  I guess I should show it to you.


I know. You're thinking "Nothing special," right? But it's seriously the exact style of desk lamp I've been searching for. (Sitting on top of the Pepsi crate I bought, which you probably noticed.) I had a brief scary moment when I got home, plugged it in and it didn't work (despite having a light bulb in it), but I tried replacing the light bulb and wham-bam-thank-you-ma'am it worked like a gem. I think I danced around the house for 5 minutes while Darren watched and tried to forget he lives with a crazy person.  I'm still not completely in love with the gold color, but maybe it will grow on me. I'm kind of a purist when it comes to antiques and I feel guilty every time I think about painting it oil rubbed bronze, so I'm going to live with it for awhile.

In the end, no such luck finding some storage bins for our pantry. Everything was either too big or too small. Our pantry is very narrow and kind of short so I guess it was too awkwardly sized for everything I came across. However, I DO want to share some of other fun/interesting/hilarious things I found at the festival, just for kicks. Some of these pics I snapped literally as I was walking by, or right as people were trying to look at the items, so I apologize that some of them aren't as up close as they could be.

These fans were exactly the style I was looking for. (Remember I was price comparing?) The smaller of the two was $40 and I didn't really feel like splurging that much, even though the fan appeared to be in good shape. Still...they're gorgeous dah-ling!


I think this piece of furniture was intended to be a workshop table, but the moment I spotted it, I thought it would make the most fantastic two-person desk. If only Darren and I didn't already have desks. ..and I was rich. And I had a car big enough to take it home in. I didn't even tempt myself and look at the price tag for fear I would be heartbroken. The patina on it is cool, but even if it's not your jam it would be an amazing piece refinished.


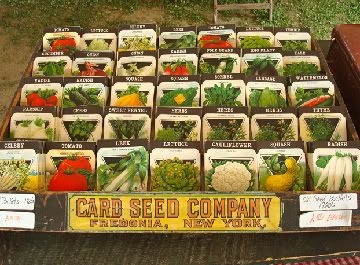
These seed packets were from the 1920s and I thought the illustrations were so cool, especially all grouped together. The vendor was asking $1 per packet. I though about buying 2 or 4 to arrange in a matted frame for some kitchen art...I don't know why but I never went back to buy them. Probably because I didn't have an exact wall space in mind and I don't like to buy things without knowing where I will put them at the time of purchase.


Ahhh, antique phones. I'm obsessed. My mom has one of the wood/metal wall mount styles and I've always wished for one for myself. I do not wish to spend hundreds of dollars on one, however, which is why I just admired them with my camera. 


This was a glass case full of old apothecary bottles. Gorgeous. A lot of vendors had a few here and there, along with old tobacco tins, but this was the prettiest display I came across.  I apologize for the blurriness from the glass. 


I loved this charming little table, thinking it would be perfect for a breakfast nook. If we didn't already have plans to make built in benches and a table for our own, I would've been tempted to buy it. 


Ok. I have no idea what this thing is, but it is SPECTACULAR. Some sort of hexagon-ish shaped drawer unit with the most beautiful carvings on the drawers. All I could think about was what n amazing storage unit it would make for a crafty person like myself. Or even someone with a big CD collection. I didn't catch a price tag.


The was one of my favorite finds. It's a brass nutcracker! You lift the tail and the mouth opens. I was so charmed by this and desperately wanted to buy it...however, the $100 price tag was not charming to my wallet. 


This German beer towel(?)/tapestry(?) totally cracked me up and I really wanted to buy it for Darren, thinking it might be fairly inexpensive. Boy was I wrong. It was almost $100! I guess it must be something rare. Just goes to show how unpredictable antiques can be.


These crazy chairs were hilarious and seemed totally out of place. I suppose the chairs themselves were probably antiques prior to someone attacking them with decoupage. They had all sorts of weird phrases and pictures from magazines on them.


Case and point: The Sexual Healing Chair. I just don't understand how someone could NOT want that in their house. What about you? If 'Sexual Healing' didn't sell you on it, maybe 'Power of Love' will.


Now THIS is something I wish I had a place for in my house. A wood "Glove" Brand Rubbers box. (Yes, I just said wood, rubbers and box all in one sentence. Keep your mind out of the gutter.) 


And last of all is the most unique find of the festival. An old movie advertisement that was painted (or somehow printed?) on wood. I couldn't find a price tag anywhere on it and I was afraid to touch it or look on the back/bottom, so I have no idea how much it was. 


I showed the picture to my movie-buff coworker, who said it was from a silent film from 1930. If it's an original, I can't even imagine how much it is worth. Sure beats the sh*t out of today's movie posters though. Could you imagine how cool it would be to hang this in your house? 

Well, that about wraps up my finds and favs from my 'Antiques Roadtrip-Fairshow.' Have I convinced you that antiques are fun, wacky and intriguing all at the same time?  Is there anything unique you've picked up in a thrift store or antique shop along the way that holds a special place in your heart or home? I really think there's no better way to make your house unique than through treasures collected over time. 

Copyright © 2009 House Made All rights reserved. Theme by Laptop Geek. | Bloggerized by FalconHive.