3
Pillow Talk
As you might have noticed in our house tour post, things are still looking a little blah in the décor department. That might have something to do with my inability to make decisions about where to put anything. And the fact that much of it is still tucked in boxes in our breakfast nook, nice and out of the way... which you would think would be a good thing, but actually isn’t because it keeps me from tripping over and cursing at it every day, both of which seem to be prerequisites for motivating me to actually do something with it. I digress. Since I’ve been all non-committal about our other décor, I thought pillows would be a great place to start. They’re useful (Darren would beg to differ) and an easy way to cheer up or change up a space. I figured I would just make new covers for our already-owned pillows (most of which currently match our hand-me-down couch)...but you probably know that’s easier said than done. Making actually requires doing, and I haven’t been doing any doing when it comes to décor this summer. Phew. Try saying that three times fast.
Anyway, I got a swift kick in the motivation-pants over the past week when I read about a Pinterest Challenge being hosted on one my favorite blogs, Young House Love. Pinterest is like an online inspiration/project binder where you can create visual bookmarks of everything that catches your eye. You ‘pin’ things to a ‘board’ (essentially a folder) with a note to remind yourself why you’re obsessing over it. The problem with Pinterest is that I have pinned so many project ideas but haven’t done most of them yet. Apparently other people have this problem too, hence the Pinterest Challenge. Deadline: Today. Aw shoot.
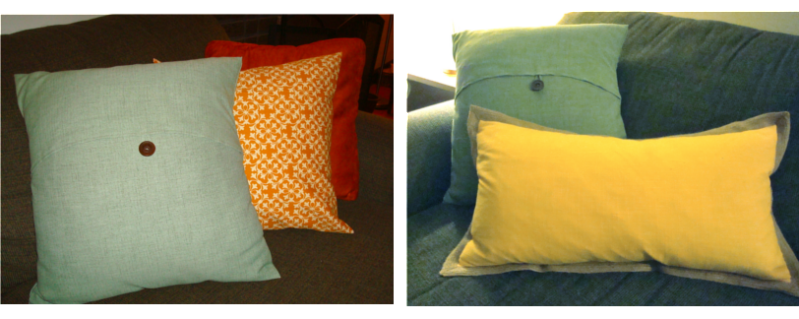
And so, I paid a little visit to my Pinterest pillow inspiration (pillow pinspiration?), these beauts from Pottery Barn:

As much as I’m a lover of most things Pottery Barn – their stuff fits the casual but collected look I’m going for - we’re on more of a Target kind of budget. So at $25 per slipcover (not including the pillow insert!), these suckers were put on the ‘to make’, not the ‘to buy’ list. They look pretty simple after all...so it’s Pottery Barn knockoff time baby. (I accidentally typed ‘Potty Barn knockoff’ the first time and giggled to myself. No one wants a knockoff of that. Maybe you had to be there.)
Back in March, a local Joann Fabrics store was going out of business and having a crazy 50-75% off sale. Knowing we would be moving in April, and anticipating making some pillow covers, I ran over there like a crazy person to buy up the whole store stock up on some fabric. $94 and $131.52 in savings later, I came home with a whole slew of future project supplies, including those for this project:

Buttons: $1.25 at 50% off (org. $2.50 each)
Indoor/Outdoor Fabric (sturdy and washable to hold up to large dog and people abuse): Marlin Linen Spa , $9.99 for 2 yards at 75% off (orig. $39.98 - $19.99 per yd).
Thread - $2.99
Pillows – already owned.
Sewing Machine - already owned. It's a White Sewing Machine from the 50's that I found at a festival for $30 - score! Even better, it was made here in Cleveland. I also adore that it's turquoise and had to share a pic.

You probably just realized that I have had the supplies for these pillows sitting in my house for 4 months now. Queen of Procrastination? This kid right here.
I made a basic envelope style pillow cover on Sunday - for which you can find many tutorials online – and realized that the Pottery Barn pillows were essentially just an envelope style pillow cover, but with the opening in front and a decorative-but-functional button closure. This (the back of the envelope style pillow I made on Sunday) vs. This (Pottery Barn's Textured Linen Pillow Covers):


See what I mean? So here’s how I did it. First, measure your pillow. Mine was 20”x20”. You will measure and cut one long piece of fabric to wrap around your pillow (why do extra sewing if you don’t have to?) and calculate it like this:
Front pillow length + Back pillow length + 2” for seams + 3” for envelope overlap.
In my case this was 20”+20”+2”+3” = 45” for the length. For the width of the pillow, add ½” for seam allowance so you have a snug fit. The dimensions of the fabric I cut were 45”x20 ½” for my 20”x20” pillows. Make sure when you are marking out your measurements that you are doing it on the wrong side of the fabric (wrong side generally = unprinted side). Now cut.it.out (image 1). (Uncle Joey from Full House? Anyone?)
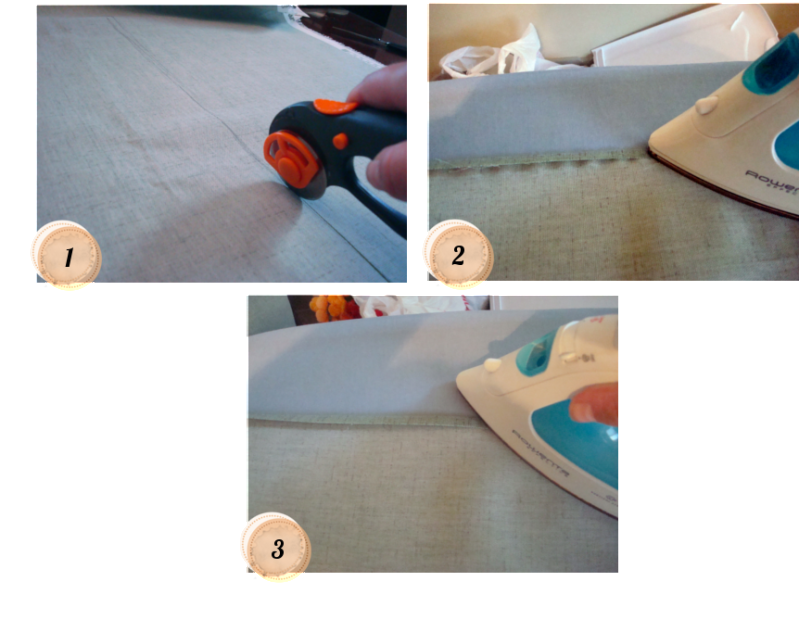
Because you want finished edges on the envelope part of the pillow since it will be facing front, you will double hem the top and bottom ends. To do this, you fold and press down ½” seam (image 2). Then fold it over ½” and press it down again (image 3). (You might need to pin it to hold it in place while you take it to the sewing machine.) Then sew a ¼” seam down the edge of each of your double hems.
Because you want finished edges on the envelope part of the pillow since it will be facing front, you will double hem the top and bottom ends. To do this, you fold and press down ½” seam (image 2). Then fold it over ½” and press it down again (image 3). (You might need to pin it to hold it in place while you take it to the sewing machine.) Then sew a ¼” seam down the edge of each of your double hems.
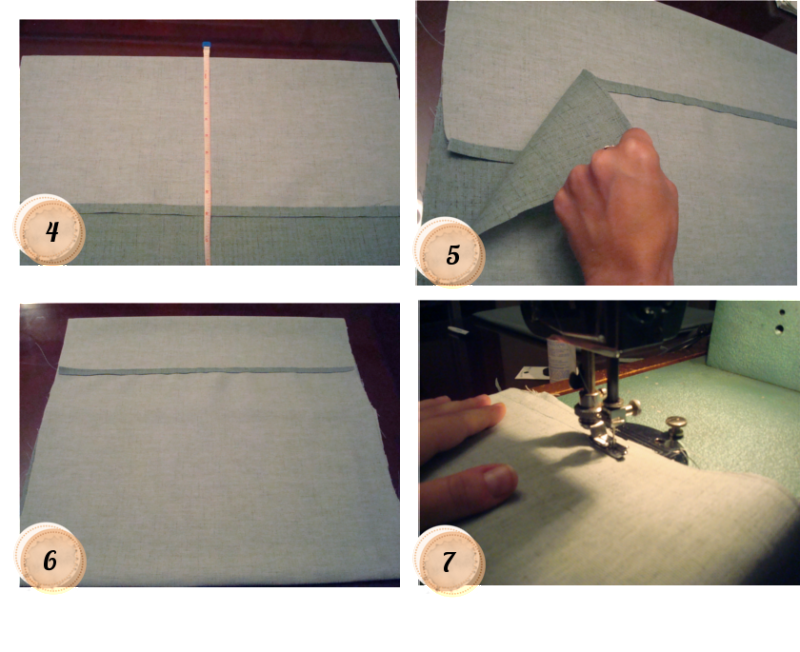
With the fabric laying right side up, fold in the top part (image 4), then the bottom part, overlapping them by 3” (image 5). Since I wanted my fold to sit just above center on the front of my pillow, I folded the top part down 9” and the bottom part up 14”. This left me with a 20” square with 3” of overlapping fabric (image 6). I pinned the top, bottom and overlapping pieces in place, then sewed a ½” seam allowance up each open side of the pillow (image 7).
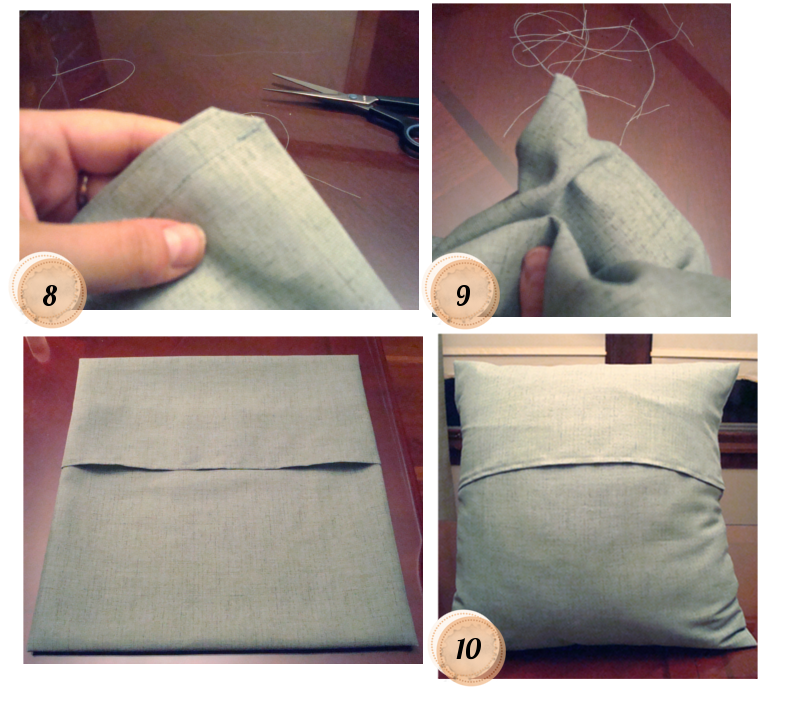 I clipped each corner of the pillow at an angle (image 8), then turned the whole thing right-side out and used a closed pair of scissors to push out nice points in the pillow corners (image 9). Aaaand insert pillow (image 10).
But wait! There’s more!
I wanted my pillow to have that fun/functional button closure, remember? So with the envelope fold side of the pillow facing frontward, I measured halfway in from the side and positioned my button where I wanted it to go (image 11).
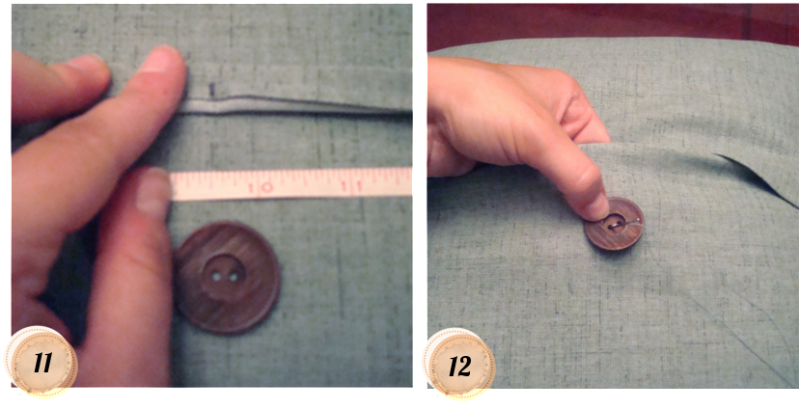
I made an inconspicuous little mark on the fabric underneath where the button would be for an easy reference point – it would be covered once the button was sewn on anyway. Then I attached it (image 12).Sew So what about that loop thing that goes around the button? Well, I had to make that too, and it was honestly probably the only difficult part of this project. I suppose I could’ve just sewn one of my unused hair bands to the underside of the flap to create an easy loop closure solution, but I wanted the loop to match the fabric for a more polished look.
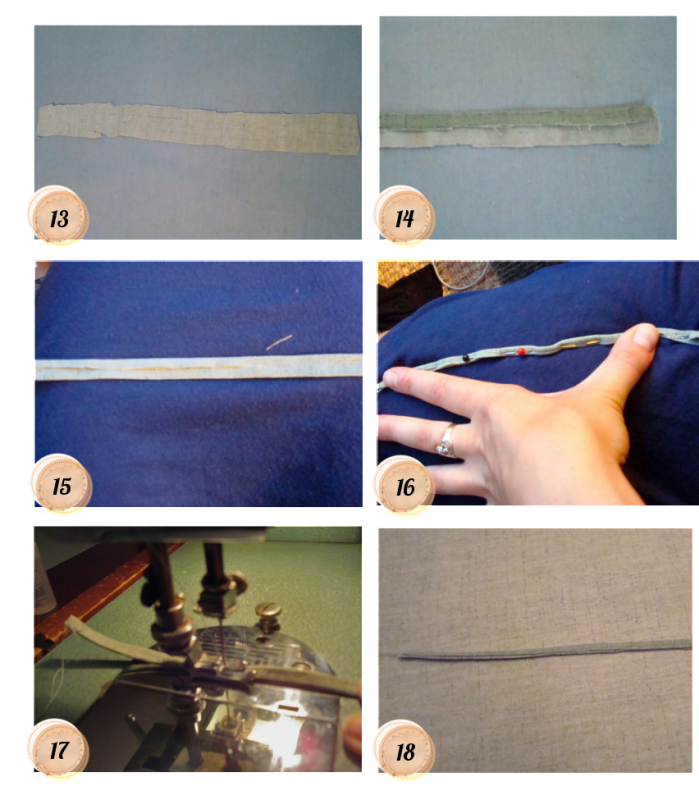 I cut out a 1” wide strip of fabric that was a few inches long (I didn’t measure since I knew I would trim it down anyway) and took it to the ironing board (image 13). With the wrong side facing up, I folded one long side so its edge was touching the center and ironed it (image 14). Then I did the same with the other long side. At this point, I realized that the skinny little flaps still weren’t laying as flat as I wanted, so I
 said screw it unfolded the flaps, ran some Fabri-Tac fabric glue down the center, and refolded the flaps. Voila. Nice and flat (image 15). This was important, because I still had to fold the fabric AGAIN. This time completely in half. I pinned it closed (because it wouldn’t stay closed on its own) (image 16) and then sewed right up the center for the length of the folded fabric (image 17). The trick to this is not sewing your fingers off going really slow and straight since you don’t have a whole lot of wiggle room. When you’re done, you have a nice custom ‘cord’ for your button loop iImage 18)!
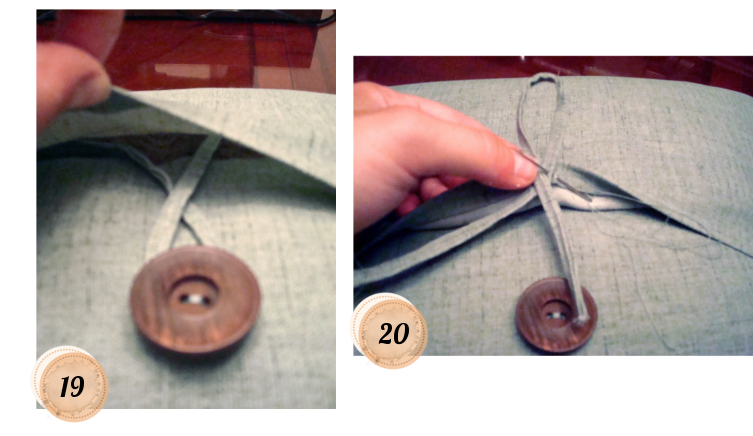 I fitted it around my button, crossing the ends in an ‘X’ on the underside of the envelope flap (image 19), then hand-sewed it on (image 20). There was some excess cording left, so I just trimmed it off.
I made an inconspicuous little mark on the fabric underneath where the button would be for an easy reference point – it would be covered once the button was sewn on anyway. Then I attached it (image 12).

And where was Darren during all of this? Here’s a video that pretty much sums up his feelings about my pillow endeavors (thankfully he doesn't take it to this extreme).
Guys and their weird pillow issues.

