0

She's Aliiiiiiive!

Posted by Corrie on 11:02 PM

Oh man, you guys. I am sooo embarrassed. Like, walked-in-on-in-a-public-bathroom-stall embarrassed. (Which actually DID happen to me at work last week...Awkward.)

It has been 2 MONTHS since the last time I blogged! I hope you haven't given up on me. I hope you didn't think I forgot about you, because I haven't. I can explain. Really.

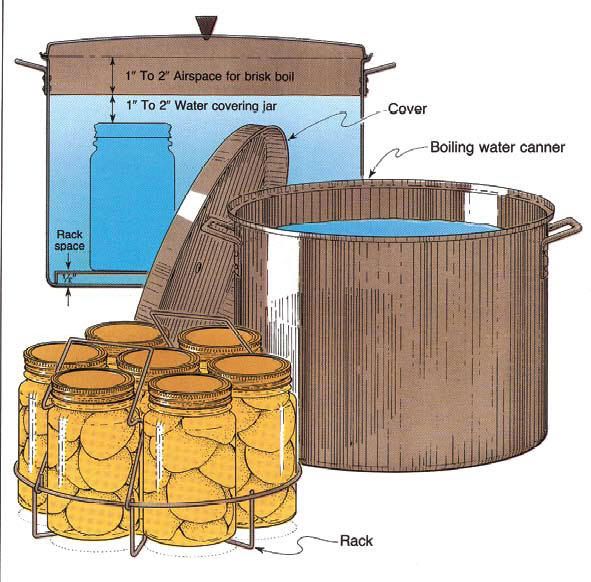
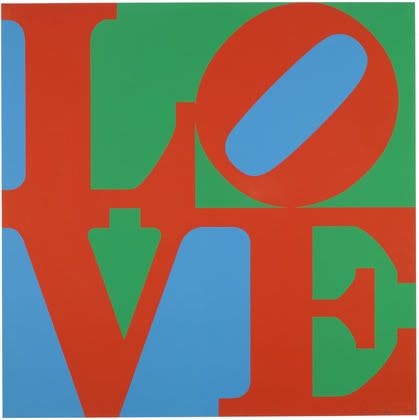
It's not that I haven't had things to blog about- because there are lots of things! It's really because the holiday season has basically lasted 2 months for me this year. Two craaaazy, family-fun-filled months. It started around the time of my last post, when I was preparing a ton of items for our office's craft show (my first show ever). I made fabric covered bulletin boards, baby headbands and pacifier clips (a post on those later), and planned to take orders for those items, plus customized LOVE prints. It was a LOT of work. I ended up selling a number of things, plus I received orders for four LOVE prints and four bulletin boards of different sizes, due by Christmas. Work began on those, during which time we were traveling to my grandma's house in Toledo for Thanksgiving, then a day trip to Wooster to cut down our Christmas tree. Then throw in beer brewing and other preparations for our 2nd annual holiday party the weekend before Christmas, plus Christmas shopping. In the meantime, my office of 300+ people was preparing to move to a new building over Christmas weekend. Being that my department facilitates the offsite storage of our files, we were basically bearing the brunt of people trying to get rid of 20+ years of stuff. I was in the office on any Saturday that I didn't already have plans, plus occasionaly working late one day per week.

On Christmas Eve, we became the third generation to host my family's traditional pork chop and pierogi dinner for about 11 people.


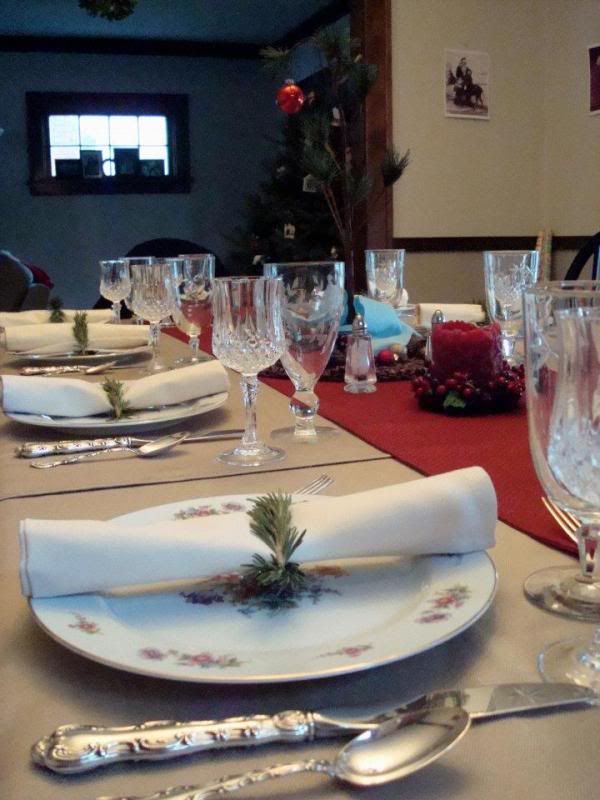
Photo taken by my 5 year-old cousin, Maeve.
The following days were spent running between my dad's house and my mom's house celebrating Christmas, followed by the arrival of my brother, Joe, on December 28th for his 3-week Navy leave from Japan - the first time we had seen him in 14 months!


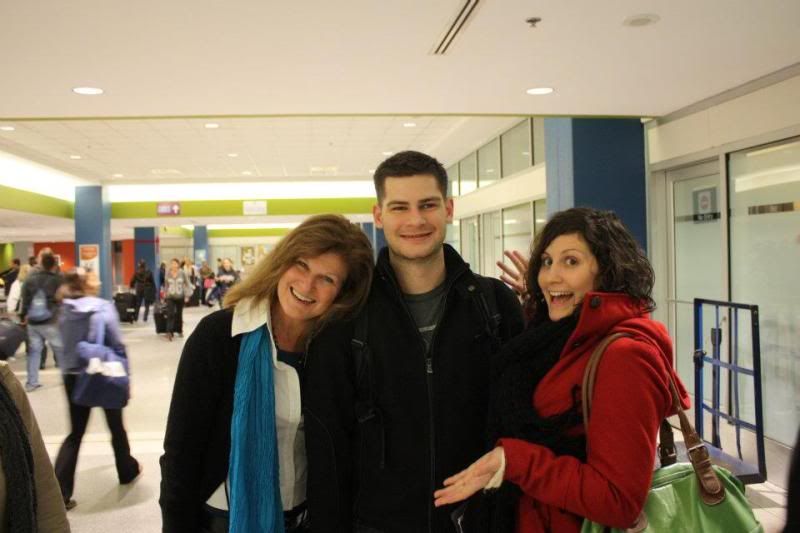
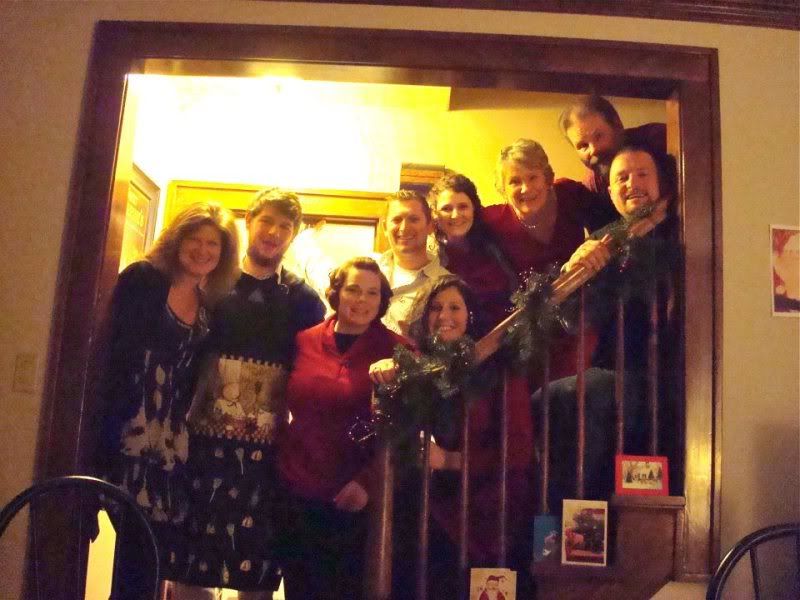
We met him at the airport and then had a little gathering at my mom's house to celebrate. A few days later came a hospital visit after the birth of my friend Emily's first baby, New Year's Eve fun with some friends, plus traditional New Year's Day dinner with my dad. At work, we were officially in our new building, but still dealing with areas under construction plus some issues with an employee. The weekend after New Year's we spent celebrating my youngest brother's birthday, which brought us into the second week of Januray. Darren and I had planned a Thursday through Saturday getaway for our 8 year dating anniversary (our Christmas gifts to each other) at a cabin in Millersburg, Ohio, which was a lovely, relaxing time, sans technology, despite some yucky weather. The Saturday we returned, we had planned to have a 'redo' of Christmas Eve dinner so that Joe could enjoy it with our immediate family. Given that some of our other in-town extended family had been out of town for the original dinner, this ended up being another 11 person event. All three of my siblings ended up staying at my house from that Saturday night through MLK Day, so we had quite an extended weekend. It was nice for all of us to be together again right before Joe returned to Japan on Wednesday, even though Darren and I were able to sneak in one more evening with him by having dinner at my mom's house on Tuesday.

On Thursday, the day after Joe left, we had more house guests arrive! My cousin, Anna, and her husband, Bill, from Maine flew in with my cousin Alaina (Anna'a sister) from Vermont for a Cleveland visit. Most of our Cleveland relatives hadn't met Bill yet, and none of us had seen Alaina in 16 years! Thank goodness for Facebook, because Alaina and I had been able to reconnect over the past couple years and discovered how remarkably similar we are. I joke that she's my "sister from another mister." (You know, like "brother from another mother"...but for girls.)


Anyway, my dad and one of my aunts joined us all for dinner at my house to celebrate the cousins' arrival. Darren and I had to work on Friday, so we left Anna, Alaina, and Bill with some suggestions for fun places to visit and they did some exploring. We had a cousin get-together with some in-town cousins that night and then had a big family gathering on Saturday at my aunt Cathy's house. It was such a fantastic time and felt as though Anna, Alaina and Bill had been with us all these years, despite the distance.

With a week to recuperate and get my house back to normal, that brings us to now! PHEW! So, now that I got that recap - which you probably didn't care about - out of the way, let me leave you with some outtakes from our Christmas card photo shoot, just so we can all get one last little taste of the belated holiday spirit before Valentine's Day is upon us....


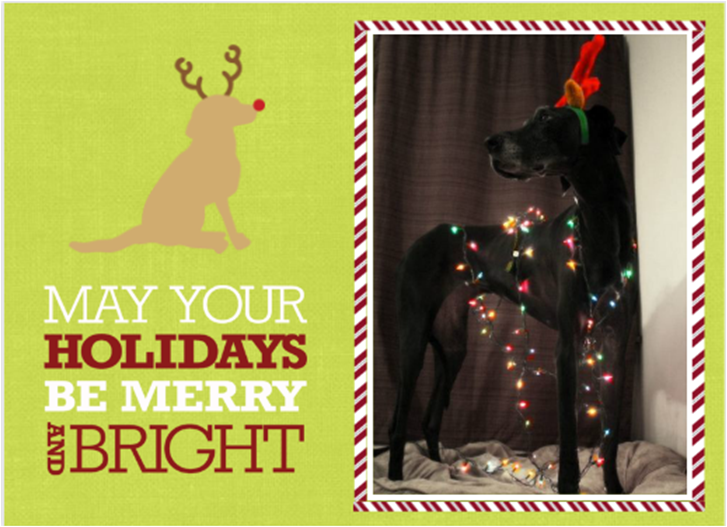
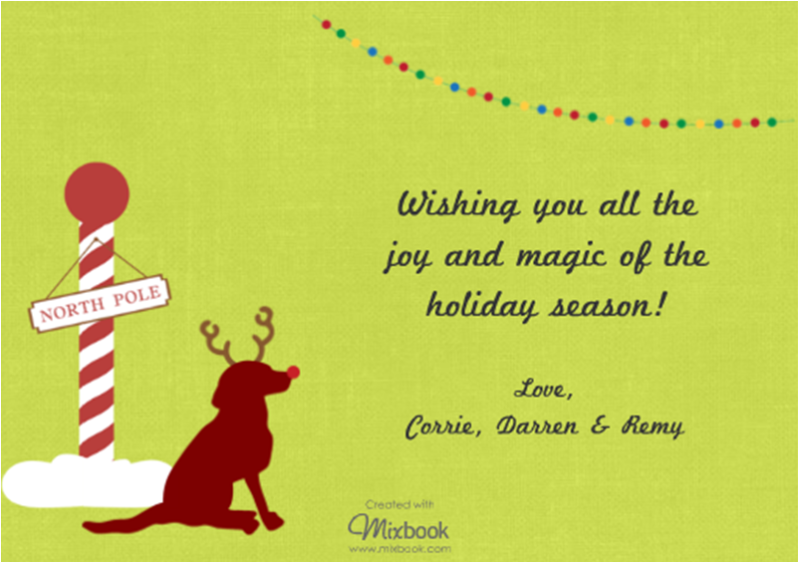
Don't worry. This was not torturous for Remy at all. In fact, my mom and I had plenty of shredded chicken to feed her and she was quite content to tolerate our shenanigans as long as the chicken was available. (Card was created by me using various pieces parts on http://www.mixbook.com/)

1

Apple Of My Pie

Posted by Corrie on 12:30 PM in ,
I’ve been doing so many projects over the past week or so that I haven’t even had time to write about them! But I wanted to jump in today with a quick post about how I spent my evening last night while Darren was at his pickup basketball game.
The holidays are my favorite time of year, and I’m always looking for ways to prolong all the delicious smells and dishes that seem to go along with the season. This is especially the case for the hellish three and a half months of Cleveland winter that follow, during which time comfort food is the only means of sanity survival. For me, apple pie is one of those comfort foods, along with apple crisp or any other dessert that remotely resembles apple pie and does not come from an aluminum can  (which is just gloppy and unacceptable). So, let me tell you how to savor the flavor. Do your own canning. Go ahead and laugh. What is this, the early 1900s? No, friends. It’s 2011, and the economy is crap. So let me teach you how to be resourceful. And lazy. At the same time. I’m blowing your mind right now, I know. Canning may seem like a lot of work on the day you are preparing everything, but it allows you to indulge in cold-weather-laziness for the rest of winter knowing that half the work of a delicious homemade dessert is already done for you. That’s a win in my book. Canned apple pie filling has its obvious use – pie – but can also be used as the base for apple crisp or topping for ice cream, waffles, pancakes, and any other creation you can think of. And, if you were an overzealous apple picker at the fruit farm this year, it’s a great way to use up any extra apples you might be tired of eating without letting them go to waste. Maybe you can even give the jars as cheap but yummy gifts to your pie-loving coworkers. (Spoiler alert if any my coworkers are reading this.) If you’ve read this far, I think you know what I did last summer was doing last night...canning apple pie filling!


Canning is different from regular cooking in that you have to precisely follow a recipe that was specifically created for home canning. Unfortunately, you can’t just take any old recipe and throw it in a ball jar, nor can you just eyeball the ingredients and make modifications to suit your tastes (which is usually my preferred way of cooking).  The reason for this is that there are food safety standards you need to adhere to when preserving food. Blah blah , standards, blah blah....Just kidding.  It’s important to find a canning-approved recipe in order to avoid the food spoiling, or even worse, getting someone sick from botulism. Don’t get freaked out. Just find a book on home canning, do a Google search for “canned <insert name of food>”  or look up your state university food safety extension office which will have all the recipes and guidelines laid out for you. Here’s the apple pie recipe I used, laid out in a nice pie chart, from the Ohio State University Extension Office. Whatever you use will likely be the same, or similar, so I’m just going to give you a little play by play of how it all went down.

Knowing I would need to move pretty quickly once the apples were prepared, I gathered up all my necessary 'equipment' and washed and dried everything. This included my water bath canner (you can find them at Walmart and most grocery stores starting around late August), 7 quart sized jars with never-before-used lids (the sealing compound needs to be intact so an airtight seal will form), a funnel, a stock pot for the 'syrup,' another pot to blanche the apples, a cutting board, bowl, and if you are lazy lucky, an 'apple machine.' Needless to say, my little kitchen was quite crowded with all this stuff. And don’t forget the apples! I gathered up the two giant bags of apples we picked at the end of September and gave them a good rub scrub down. I think they were a mixture of Cortland and Jona-gold, but I don't remember because it was so long ago. There we a few bad ones I had to throw out, which didn't surprise me because it had been awhile since we picked them.


Enter stage right: The Best Kitchen Invention Ever. Action!


It's an apple corer-peeler-slicer thingy...aka torture device...aka apple machine (I think that's its real name)! Mine was a gift from my mom, but I think you can find them on Amazon. Even if you only make apple pie once a year, you need one of these. It simultaneously peels, cores and slices your apples in a matter of seconds. I think I was able to get through all the apples I needed for my 7 quarts of pie filling within 15 minutes. Ah-mazing.  Anyway, before I got carried away with my apple torture device, I started heating a stock pot half full with water in preparation to blanche the apples. I also filled my water bath canner half full with water to start bringing it to a simmer. (I wanted it to be ready ahead of time because as soon as the jars are filled, they need to start processing in the water bath canner immediately.) I cut the apple rings in half and set them aside with a bit of lemon juice until I could get through all of them. Then I blanched them in batches.


(I promise my apples weren't really a freakish yellow color. I just have terrible lighting in my kitchen, along with yellow painted walls, which tends give all my in-the-kitchen pictures a yellow tint at night.) The already blanched apples stayed warm in a covered bowl while did new batches. When all the apples were ready, I prepared the 'syrup,' which consisted of spices, water, apple juice, sugar and a canning-specific thickening powder called UltraGel. (UltraGel takes the place of cornstarch and also happens to be a pain in the arse to find. Hence the reason I picked apples in September and am just now canning them in November. I ended up ordering it online.)  It all went in the pot to bubble and thicken, while I whisked away so nothing would clump or burn on the bottom.


Once everything was nice and thick, I added the apples back in, folding them so they wouldnt break apart while being fully coated by the syrup. Oh boy were things starting to smell delicious. I wish they made scratch-and-sniff computer screens for your benefit. Now that the whole shebang was ready, I spooned the mixture into my quart sized jars, using a wide mouthed funnel and leaving an inch of head space at the top.
Photo courtesy of www.pickyourown.org
I found the funnel (along with a magnetic lid grabber and plastic spatula) as part of a canning tool kit when I bought the water bath canner. Not only does the funnel fit perfectly inside the jar, but it reaches exactly an inch down into the jar, which serves as a foolproof guideline for the highest point to which you should fill.


Remove the funnel and take a look at the sides of the jar. You will likely see a few air bubbles, so use a spatula or knife to slowly push along the sides and get rid of them.


Then I placed the lids on the jars and attached the screw caps. Most water bath canners come with a metal rack that perfectly holds up to 7 quart sized jars.

Photo courtesy of www.pickyourown.org
I put 6 in mine, then used the handles to lower the rack into the pot (which should be at a simmer by now if you started it earlier.) The water should cover the jars by 1 to 2 inches, so if it doesn’t, add a bit more.


With the water at a boil, I put the lid on the pot and started the processing time according to the recipe – in this case, it was 25 minutes. When the processing time was up, I pulled the hot jars out using a jar grabber (also in the canning tool kit) and set them on a towel to cool. I also checked the lids to make sure they were concave, meaning they have sealed properly.

Photo courtesy of www.pickyourown.org
In the words of Borat - great success!

You might have realized at this point that the recipe makes 7 quarts of pie filling, but I only processed 6 jars. Well, you didn’t expect me to stand around smelling all this deliciousness and not eat any of it, did you!? I mean, how could I give away all this pie filling without even knowing how it tastes? So, I dumped what would’ve been the 7th jar of filling into a small baking dish and whipped up a quick crumble topping. If you needed to be convinced of the convenience of this recipe, it took me about 5 seconds to put the filling in the pan and mix it with a dash of vanilla extract, and only another 5 min to make the crumble topping ( 1/3 C oats, 1/3 C flour, ½ C brown sugar, 6T cold butter, a dash of salt and a dash of cinnamon mixed with a fork until crumbly). I baked it at 400 degrees for 30 minutes – a sweet surprise for Darren when he returned home from basketball.


Who am I kidding. It was really just a sweet surprise treat for me. Wink!


25

DIY Typography Art

Posted by Corrie on 9:19 AM in , ,
Happy Wednesday! If you remember from Monday, among the pumpkin carving shenanigans in my Halloween post, I let you all in on a little preview of my latest DIY project. In case you missed it, I made a personalized, typographic art print for Darren's niece/my goddaughter, Olivia, who was celebrating her first birthday this past weekend. Her mom had made a specific gift request, but since I like to give homemade gifts, I thought I would supplement the requested gift with something else. Of course, I turned to my favorite inspiration-inducing culprit, Pintrest, to get some ideas. If you're a frequent reader of this blog (do any actually exist?), you might remember this Pottery Barn 'pinspired' home decor project awhile back. We interrupt this program for a brief announcement.

If you haven't yet discovered Pintrest, you don't know what you're missing. It's like the preferred drug of eye-candy oglers and bookmarking fanatics. I'm addicted, on it until the wee hours, and it makes me feel warm and fuzzy inside...only instead of just saying no, I say heck yes every time. And it's legal.

There. I'm done. Sorry for the bordering-on-creepy analogy. Back to business.

There were tons of adorable (and DIY-able) baby items and projects I was finding, but for some reason, the personalized art was really striking a chord with me. I think what I liked most about the art was that many of the prints could be appreciated by Olivia for years to come, versus clothes and accessories, which she would quickly outgrow. These were a couple of my favorite finds.

                                                                              Source: etsy.com via Corrie on Pinterest

  Source: etsy.com via Corrie on Pinterest

I loved how the first print colorfully emphasizes "I love you" within the alphabet, while the second was more personalized with a name and initial.  Apart from all other practical and baby-gift-related reasons, I think that typography is pretty much the bees knees (does anyone even use that phrase anymore?). Plus it seemed like something my graphic-arts-rookie self could tackle. Double win. For some reason, seeing the "I love you" print reminded me of Robert Indiana's iconic LOVE screen print.

Photo courtesy of www.moma.org
And...woop there it is was. My inspiration (or perhaps 'pinspiration,' thanks to Pintrest's influence). I could do my own take on Indiana's print, personalizing the 'O' with Olivia's name repeated in different fonts and sizes like the 'E' print above. Since I didn't have a plain template to work from, knew I would likely need to make a lot of text boxes, and assumed I would want to have a lot of control over placement, color etc., I knew Microsoft Publisher wasn't going to cut it. However, I don't have Photoshop or Illustrator (I'm too poor to invest the money into buying those programs considering the little bit of design stuff I like to pretend I can do), so I jumped into my ghetto fabulous free version of Gimp, a Photoshop program wannabe.                


From there, I opened a blank 8.5"x11" 'image,' found a serif font that looked like the one in Indiana's print, and created a separate text box for each giant letter. I rotated the 'O' and changed the font color to a shade of grey so that I could use it as an outline over which to place the text boxes. 


Next mission: create many, many text boxes. I wanted one of Olivia's names to stand out more than the others, so I made that as the first layer in a nice scripted font. Then, like a mad woman, I continued creating 'Olivia' text box layers in all sizes and fonts. Some were all lower case, some all upper case, and some in the traditional proper noun way, but I tried to vary them to keep it interesting. It really started filling in, as you can see in the up-close-and-personal screen shot below.


Some of the small spaces were getting hard to fill in, but I tried not to let them bother me too much. In fact, I saved a number of them for last, since it was hard to find fonts that I could make small enough to fit, but would still be legible. Once everything was filled in, I removed the original 'O.'  


I was so excited about how it turned out that I got off the couch and did an Ellen-esque dance. Only substitute the cheering audience and President Obama with an unfazed Darren at the other end of the couch (my spontaneous bursts of dancing no longer surprise him). 


Somewhere between finishing the 'O' and busting a move in my living room, I came to the realization that I could do the same design with the 'V,' which couldn't be more perfect since Olivia's last name is Vaughan.  (The excitement probably only enhanced my dance moves.) So I immediately got to work on it in the same way I started the 'O' - by greying out the letter 'V', creating a large focal point word in the same font as the one in the 'O,' and throwing in text box layers. It was starting to look like The Sorcerer's Apprentice up in this place, only with multiplying text layers instead of brooms.


The skinny, right side of the 'V' was a bit challenging because the fonts had to be so small to fit. I didn't want them all the same size, so I made some of the words vertical or broken into two lines. 


When all was said and done, I removed the original, grey 'V.'


I was really happy with how it came out, but it needed some color. Her room has light blue and light green paint colors, so I considered coordinating the print. However, I also thought about using colors that would be more timeless (less pastel/baby-ish) in hopes that Olivia would still enjoy her art as she grows older and into more mature room decor. 


Ultimately, I decided that the green and blue looked too washed out. The black and rose were a bit more sophisticated, plus the pink color of the focal words drew attention to her full name within the initials. 


A smidge of color and 230 text layers later, I was done. Since Olivia's room doesn't currently have anything on the walls except a tree and Winnie the Pooh mural in the far corner (I knew this from little a reconnaissance mission I did last time I was at their house), I wanted to make sure the print was a fairly large size. I found a 12" square frame with an 8" mat, which I thought would be the perfect size - big enough to read the print and square to fit the shape of the text. Plus it was on sale for 50% off at Michael's. Boo-yah. I had some leftover 110lb card stock leftover from doing the programs for Rachel's wedding, so I took some of it to Office Max to have my art printed. It came out really nice (though I might try matte photo paper next time just to see what the difference is). I just barely had enough time to frame and wrap it before the party, so I didn't have time to take a picture. Jamie (Olivia's mom) had to send me one from her phone later. 


It seemed that a lot of people at the party liked it, and one of my friends even suggested that I try selling other customized versions on Etsy. What do you guys think? Would you be interested in something like this, either with a child's first and last name or a whole family's first names and last name? Now that I have a 'template,' I wonder how long it would take me to make a new version. Regardless, I hope it has inspired you to try your own typography art. It really was quite simple...just time consuming!...but with a fun result.

Since Pintrest was a big part of my inspiration for this project, I've decided to link this post up as part of the fall Pintrest Challege, hosted by the lovely and always inspiring ladies at Young House Love, Bower Power, Ana White and House of Earnest. (I participated in their summer challenge here.) I could only dream of aspiring to their level of blogging greatness and general DIY coolness. 


As well as a couple of other link 'parties':

Good Life WednesdaysPhotobucket
As always, I would love to hear your feedback! Do you have any cool typography prints in your house? Do you think this project has Etsy potential? 

5

All Hallows Eve

Posted by Corrie on 11:05 PM in ,
Happy Halloween everyone! I think what might be scariest about today is that it has been nearly a MONTH since I've posted anything! Admittedly, life has gotten in the way a bit this October - a trip to Chicago to run the Chicago Marathon with my good friend, Jeff, and a trip to Toledo to see my Grandma and visit my brother at BGSU, among other things -  so I haven't been doing as many projects and posts as I would like. However, there must be some sort of voice inside my head telling me to make up for lost time, because I’ve decided to cram in a number of projects between last week and this week. I must be crazy...Is there a full moon tonight?...Sometimes I hate that little voice...Anyway, you know what ‘lots of projects’ means. Lots of things to post about! So, I will be back in a couple days to dish on some typography art I made, and then soon after that with an outdoor house upgrade and some DIY baby shower gifts. But for now, in honor of Halloween, I thought I would share our pumpkin carving activities from this weekend, along with a few tips and tricks my family likes to use.

This weekend was another busy one. We hit up The Brew Kettle on Friday to buy some ingredients so that we could homebrew the second of two beers we plan to have ready for our holiday party in December. (Check out this post for a glimpse into how we brew beer in our kitchen.) On Saturday, my dad came over to help Darren with an outdoor project that we needed to finish before the ground freezes (which is quickly approaching!). Meanwhile, I did a little cleaning and worked on a typographic art gift for Darren’s niece/my goddaughter Olivia’s first birthday. I can’t believe how much that sweet little one has grown over the past year. This is a picture of her from last Halloween, wearing a pumpkin hat I made, just a week after she was born.


We brewed the beer on Sunday morning and I had Olivia’s “art” printed just in time to go to her party. Here’s a little preview (I’ll tell you more about how I made it on Wednesday):


Her parents did a great job with the party – yummy food, an activity for the kids, and lots of people. Afterward, we went to my mom’s house to carve pumpkins. In true Corrie-and-Darren-procrastination-spirit –  because planning ahead is for smart people lame – we waited until the day before Halloween to buy our pumpkins. Bad choice. I/We stopped at 5 different places trying to find pumpkins, and were overjoyed to finally come across some pathetic looking, on-the-verge-of-rotting ones at Giant Eagle. Didn’t matter. It was something to carve. All was made better when we arrived at my mom’s house, where she had everything ready, including drinks and a cozy fire, which our dog, Remy, loves. (To clarify, Remy loves the fire, not the drinks...though she HAS been known to try stick her face in my wine glass when I’m not looking, so maybe the latter is true as well).


My mom tried to get in some pics when she wasn’t doing her own carving. Since most people probably already know how to carve a pumpkin, I don’t feel the need to give you a complete rundown, but here’s the pics with a few tips...pics and tips...that sounds fun.

Look for a pattern online. Better Homes and Gardens has some great free ones for all experience levels, including dog breed patterns, though Remy was offended that they didn’t have a Great Dane. Print out your pattern and hold it up to your pumpkin. Cut inward slits in the places where the pattern is not laying very flat to help form it around your pumpkin. Secure it with tape or pins. Use a pen, pushing really hard, or use something with a point to poke holes in order to trace the pattern onto the pumpkin. Putting transfer paper under your pattern is the easiest, if you have it, and you don’t have to press as hard when you use it.


When you cut out your pumpkin lid, be sure to angle the knife outward from the center of the hole so that there is a slanted ridge for the lid to rest on when you put it back in place. Otherwise, if you cut straight up and down, you risk your lid falling through your pumpkin. Take it from Darren. He had to rig his up with some toothpicks. Rookie mistake.


For a sweet smelling surprise when you light your pumpkin, sprinkle cinnamon on the underside of your lid after you cut off the goopies. Goopies is the technical name, you know.


It's worth picking through the goopies to pull out all the pumpkin seeds - think of it as a bonus snack. Lay them on a baking sheet to dry a bit, then mix in a bowl with 2 teaspoons of melted butter (or olive oil) and spices. Try chili powder with cumin or cayenne for spicy, cinnamon and brown sugar for sweet, or just plain ol' seasoned salt. Spread them back out on the baking sheet in a thin layer and roast them in the oven at 300 degrees for 40 minutes, or until the seeds are light brown.

If you’re unsure of your carving abilities, pick something with simple shapes, like Darren’s owl. It wasn’t too challenging, but turned out super awesome. He was seriously doubting his carving abilities, but I think he did a great job. And now he has renewed confidence for next year.


Or, if your eyes are bigger than your carving skills, you want to spend a couple hours getting to know your pumpkin, or don’t mind ending up with a claw hand by the time you’re done, pick a more complicated pattern with small openings, like I did. Overachiever mistake.


Ironically, the very last piece I carved out caused some other thinner sections to detach. If this happens, don't despair - you can use pieces of toothpicks to re-stabilize them.


Maybe carving out pumpkin chunks isn’t your idea of a good time. You can always ‘shade’ your pumpkin by just cutting away the outer skin and a little bit of the flesh. The light will still shine through, but with a softer glow that creates a different effect. Most of the pattern I carved two years ago was done using this method.


Enjoy it as much as you can before it rots, or in our case, before the squirrels eat it! These were what my mom and sister carved.


Feel free to share links/pictures of YOUR pumpkins – it’s so fun to see what everyone made! Happy haunting tonight!


Copyright © 2009 House Made All rights reserved. Theme by Laptop Geek. | Bloggerized by FalconHive.