0
Recap, Refs & Recipes
Just the fact that I named this a 'recap' is already terrifying me into jibber jabber submission, so I will do my best to tame my feverish fingertips and keep this briefer than last time.
I'm going to be real with myself and assume that my tendency to blab might have kept some people from reading through all of my last post. (Hey, I don't blame you. Confession. There are a number of blogs Iwish I could be as awesome as adore/follow and some days I just don't have the time/desire to read through long posts either.) Besides that, I was super charmed that a few people not only read my whole seed starting post, but enjoyed it so much that they actually asked me for advice. Since I'm feeling a bit more humble than masterful, I thought I would include the most helpful references I used in my gardening adventures, because what fun is knowledge if you can't share it with others?? So, in this post, I will attempt to do an abbreviated recap - kind of like a little step by step cliff notes version of seed starting with tips and tricks - along with my fav references, and a couple bonus recipes for what I like to do with my garden goodies. Sharing is caring. I feel like I'm channeling my inner Mr. Rogers today.
 In that spirit, I will proceed to put on my blogger sweater and slip on my indoor blogger sneakers so we can get this party started.
Pause. Let's do this in reverse order. Recipes, Refs, Recap. Just like that. That way the people who are thinking 'I hate vegetables. Please stop talking about them' or 'I'm only here because the word recipe was in the title and I want food' don't have to scroll through the longer part to get to the goods.
Margherita Pizza
This is what I have been obsessively wanting to eat all summer with the tomatoes and basil from my garden. I have a picture, but can't seem to find it. We make a baking sheet-sized pizza, so all ingredient amounts are based off of that. You can use our sauce and yeastless dough recipes, use your own, or buy premade.
Grilled Zucchini & Squash
Ingredients:
Olive oil, Balsamic Vinegar, Salt, Pepper, Dried Oregano, Dried Basil
Slice your zucchini and squash lengthwise, approximately 1/4" to 1/2" thick. If your vegetables are very large, you might want to cut them in half widthwise before slicing. Lay out on a baking sheet and drizzle with olive oil and balsamic vinegar. Sprinkle with salt, pepper, and dried herbs to taste. Let marinade or mix around if desired. Grill until the veggies just start to become tender.
And handy websites:
Recap. The no-B.S. seed starting run down.

If you plan on starting your own seeds, you need to start planning in January or February. That might sound a little crazy, but for anyone doing seed starting, you will need to start your seeds in March.
This is clearly not comprehensive advice, but hopefully gives you a few tips that worked for me, as well as some new tricks to make growing your own organic food easier for you. Or I guess semi-organic if some of the seeds weren't labeled as 'organic' to begin with. But you get the point. I really encourage you to check out the books I reference because they have such a wealth of knowledge and options, even for those with the tiniest spaces. Don't forget, you can grow upward too - vertical gardening!
Ok, so I failed at keeping this short. Like, really failed. But maybe it was useful at least...?
*I wasn't paid/perked in any way for offering up the references I listed - I only WISH I could be cool enough to get offers like that. They are just what I found to be the most helpful for me.

I'm going to be real with myself and assume that my tendency to blab might have kept some people from reading through all of my last post. (Hey, I don't blame you. Confession. There are a number of blogs I

Pause. Let's do this in reverse order. Recipes, Refs, Recap. Just like that. That way the people who are thinking 'I hate vegetables. Please stop talking about them' or 'I'm only here because the word recipe was in the title and I want food' don't have to scroll through the longer part to get to the goods.
The Recipes.
Margherita Pizza
This is what I have been obsessively wanting to eat all summer with the tomatoes and basil from my garden. I have a picture, but can't seem to find it. We make a baking sheet-sized pizza, so all ingredient amounts are based off of that. You can use our sauce and yeastless dough recipes, use your own, or buy premade.
Ingredients:
2-5 tomatoes (depending upon the size you have), sliced; 1 (16oz) ball of fresh mozzarella; 20 fresh basil leaves, torn ; flour (or cornmeal)
Lightly sprinkle flour or cornmeal on a baking sheet. Roll out the dough into a rectangle and transfer it onto the baking sheet, stretching and evening out the dough to fit. Crimp around the edges for the crust. Spread the desired amount of sauce out on the dough with a spoon. Lay out the slices of mozzarella on top. They don’t need to be overlapping because they will spread out as the pizza bakes. Top with tomatoes. Bake in the oven for about 20 minutes at 400 degrees, or until done. (Alternatively, you could try grilling the pizza on low heat). If desired, with 5 minutes left in the bake, mix together equal parts olive oil, liquid from a jar of minced garlic, and a pinch of sugar until the sugar dissolves. Brush onto the crust and continue baking. Garnish with fresh basil before cutting and serving.
Yeastless Dough:
Ingredients:
1 cup flour, 1/3 cup milk, 2 T veg oil, 1 t baking powder, 1/2 t salt
Measure out the liquids over a bowl and let them spill over just a bit. Mix everything together with a fork until it mostly comes together, then finish mixing with your hands and let it sit, covered, for 15 minutes. For a baking sheet sized pizza, make two balls of dough and then combine them before you let them sit for 15 minutes.
Sauce (makes enough for 2 baking sheet sized pizzas, depending upon how ‘saucy’ you like it):
Ingredients:
1 can condensed tomato soup, 1 (6oz) can tomato paste, 1 tsp. Paprika, 1 Tbsp. dried Oregano, 1.5 tsp. dried minced garlic (or substitute 1 T fresh minced garlic), Crushed Red Pepper (to taste)
Combine everything.
Grilled Zucchini & Squash
Ingredients:
Olive oil, Balsamic Vinegar, Salt, Pepper, Dried Oregano, Dried Basil
Slice your zucchini and squash lengthwise, approximately 1/4" to 1/2" thick. If your vegetables are very large, you might want to cut them in half widthwise before slicing. Lay out on a baking sheet and drizzle with olive oil and balsamic vinegar. Sprinkle with salt, pepper, and dried herbs to taste. Let marinade or mix around if desired. Grill until the veggies just start to become tender.
Preserving Herbs
What do you with all the fresh herbs you've grown if you want to make them last through the winter? If bringing them inside isn't an option, dry or freeze them.
Drying:
Cut the herbs, wash and let dry. Tie them in loose bunches with a rubber band or string. Poke a few holes in some paper bags and place an herb bunch upside down in each one, closing the mouth of the bag around the stems. The herbs should be hanging freely inside the bag. Doing so will keep the oils of the leaves from rubbing off on the bags, therefore losing flavor. Hang them in an area with low humidity and good air ciculation for a week or two. Store them in jars or bags on the stem, or remove the dried leaves and store in a small container.
Freezing:
Cut the herbs, wash and let dry. Most herbs can be frozen in a plastic bag, placed directly in the freezer. Another method, which I used for cilantro, was to remove the leaves from the stems, spread them out in a dense arrangement on half a baking sheet, then just barely cover with water. I used folded plastic wrap to keep the water and cilantro from flowing into the empty half of the baking sheet. Place in the freezer until frozen. Pull out the sheet and break the 'herb ice' into chunks. Place in a bag back in the freezer for future use. You can also do this in ice cube trays. Basil turns black when it freezes, so despite the great flavor it retains for general cooking, it is not worth freezing basil for use as a garnish.
The Refs.*
Here's a couple books that I used as my holy bibles of container gardening. Not only are they practical for anyone with even the tiniest smidge of a concrete or balcony 'backyard,' but they emphasize ways to grow a flourishing garden without the use of chemical pesticides or fertilizers = my kind of jam. Plus, they elaborate on and go beyond much of what I touched on here, but in a much more eloquent and intelligent way than my lowly blogger self ever could. Seriously, if you are considering planting even one thing and have any intention of eating part of it, you need to read one or more of these books. All hail to these awesome gardening folk:
Fresh Food From Small Spaces – R.J. Ruppenthal
- If you are a city dweller or apartment resident who claims to not have space for a garden, this book will blow all your preconceived notions out of the water. As a city dweller himself, the author tells you how to make the most out of every square inch you have, indoors and out. He provides information on making your own self-watering containers and using vertical gardening and reflected light strategies to maximize your space and lack of sunshine. Apart from your typical container gardening advice, he covers tops like grain/salad sprouting, making yogurt and kefir, and cultivating mushrooms (all which can be accomplished in an urban kitchen), as well as raising chickens and honeybees in the city. He also touches on composting and vermiculture (composting with worms). For those concerned with living sustainably , his last chapter is dedicated to ways in which you can apply the book’s methods for getting through small food shortages, creating small scale energy solutions, and building a sustainable future. He concludes with a list of helpful tools and suppliers.
The Bountiful Container – Rose Marie Nichols Mcgee & Maggie Stuckey
- Don’t leave home try container planting without it. The ladies give detailed info on container types (anything can be a container!), planting by color, and succession planting (cool season, warm season and extended season crops). They discuss pests and treatments specific to container gardening, and they tell you which plants are not worth your time to grow in containers. The majority of the book is dedicated to giving detailed info on the vegetables best suited for container gardening, with notes about tried and true varieties, including sections on fruits, herbs, and edible flowers. There are illustrated, theme-based container garden plans and recipes scattered throughout, with mail order resources at the end.
Carrots Love Tomatoes – Louise Riotte
- The definitive companion planting guide, this book has everything you could ever want to know about the ways in which vegetables , herbs and fruits can mutually benefit or hinder each other when planted in certain combinations. Going even further, she also covers companion planting for nuts, wild plants, grasses and grains, and ornamental trees and shrubs. The author gives garden techniques for intercropping, mulching, shade planting, and vertical gardening, as well as insect control through companion planting. Her section on natural pest control methods is quite exhaustive, and you might be surprised by her poisonous plants chapter, which discusses some common plants you will find in the garden, or even in your kitchen. The last section is dedicated to all sizes of illustrated garden plans, including small scale and window box options.
And handy websites:
USDA Hardiness Zone Finder - It's in the name. Know before you grow.
Cubit's Organics - Organic, family run seed company on Etsy that has "high quality organic, rare and heirloom seeds." Not only do they have some unique varieties, but their pictures are gorgeous and I adore their well-designed, sustainable packaging. Their blog is also fantastic and they post some great recipes.
Seeds of Change - Organic seed catalog (online or by mail). They carry heirloom, rare and traditional seeds with the goal of "preserving countless heirloom seed varieties in danger of being lost to the 'advances' of modern industrial agriculture." These people make me want to start a farm and grow all their vegetables. Most of their products are seeds, but they also carry live plants and have a wealth of resources on their site.
Companion Planting Chart - A fantastic companion planting resource that puts the most popular veggies in a table comparing which plants benefit and hinder each other. This is the best visual summarization of companion planting that I've found.
Seeds of Change - Organic seed catalog (online or by mail). They carry heirloom, rare and traditional seeds with the goal of "preserving countless heirloom seed varieties in danger of being lost to the 'advances' of modern industrial agriculture." These people make me want to start a farm and grow all their vegetables. Most of their products are seeds, but they also carry live plants and have a wealth of resources on their site.
Companion Planting Chart - A fantastic companion planting resource that puts the most popular veggies in a table comparing which plants benefit and hinder each other. This is the best visual summarization of companion planting that I've found.
Vegetable Garden Planner - Experiment with garden designs or plant placement. Most useful for people doing square foot or in-ground gardening. It gives you frost dates, best planting times for different veggies, and cute little icons for your plan design. Free 30 day trial if you just want to make a couple plans and be done, or sign up for a full year.
Better Homes and Gardens - "Garden by Number" is what I like to call it. They do the work for you by putting together garden plans that work well, then they give you the plant info so you can replicate it. Many of them are for flowers gardens, but they have some vegetable plans too.
Home Depot - If you sign up for their free garden club, they will send you coupons and monthly updates/reminders about regular garden maintenance for your region. Might be more useful for people who have a yard.
Zone 5 Planting Calendar - Wowzers. If you live in Zone 5 (aka anywhere near Cleveland), check out this guy's planting schedule. Talk about maximizing your growing time. Whether you want to get really ambitious or just inspired, the author gives a full run down from planning to garden productivity 12 months of the year.
Zone 5 Planting Calendar - Wowzers. If you live in Zone 5 (aka anywhere near Cleveland), check out this guy's planting schedule. Talk about maximizing your growing time. Whether you want to get really ambitious or just inspired, the author gives a full run down from planning to garden productivity 12 months of the year.

If you plan on starting your own seeds, you need to start planning in January or February. That might sound a little crazy, but for anyone doing seed starting, you will need to start your seeds in March.
- Determine your available space and any space constraints - Maybe you don't have garden beds or much of a yard, but you have room for a small square foot box. Maybe you are a city dweller and only have a small balcony or fire escape to use. Maybe your space doesn't quite get 8 hours of sun. Good news. You can grow veggies in all these places. But these are all things that will determine what you can successfully grow, so you need to consider them first.
- Get in the zone - I'm not talking about Auto Zone. Your garden climate hardiness zone. Cleveland is in Zone 5. You can find out yours here. This is important for knowing what plants will tolerate your climate as well as when the first and last frost dates are for your area. Frost dates determine your growing season aka the earliest date you should put your seedlings in the ground. You don't want to spend three months trying to grow those little guys only to kill them off by planting them too early.
- Decide which veggies/herbs are most important to you - Which do you consume most? The ones you think will give you the biggest bang for your buck (slash that will produce a lot from a small plant in a small space)? The ones that are most expensive to buy at the store? We eat tons of peppers and tomatoes, and peppers are pretty expensive, so those were important to us. I knew I would get a lot of green beans from a small space, so I thought they might be worth planting. How big will the plants of your favorite veggies get, and do you have room for them? Though squash and zucchini might be yummy, the plants get Enormous with a capital E, so they might not be the best choice for a container garden on the balcony of a high rise in NYC.
- Decide on something new/different/fun to grow - This step is kind of interchangeable with #5. Experiment with a new type of veggie or herb that you think might be fun, something that looked cool in a catalog (like the amazing and organic eye candy in Seeds of Change ), or something you like but don't eat very often. If your space is really limited, it might only be one plant. It will be exciting if it grows well, but you won't be too heartbroken if it doesn't, and in the meantime it's not taking away much real estate from more productive or desired plants.
- Pick out/order your seeds - Seed options are everywhere. You can go to your local garden supply store, Home Depot or Lowes and they will have some of the most popular varieties of vegetable and herb seeds, some of which are organic. If you are really concerned about organic gardening or are looking for special or unusual seed varieties - heirloom tomatoes, purple beans, spicy mustard greens, or chocolate spearmint, perhaps - you might want to consult some gardening catalogues or websites (see my favs in the refs section). These is where the real fun happens. The whole world of different vegetable and herb varieties is amazing and you might never have known they existed because you don't see them in the grocery store. Only by growing your own can you experience them. I guarantee you will be like a kid in a candy store, but try to restrain yourself and only choose one or a couple 'splurges' to experiment with.
- Start your
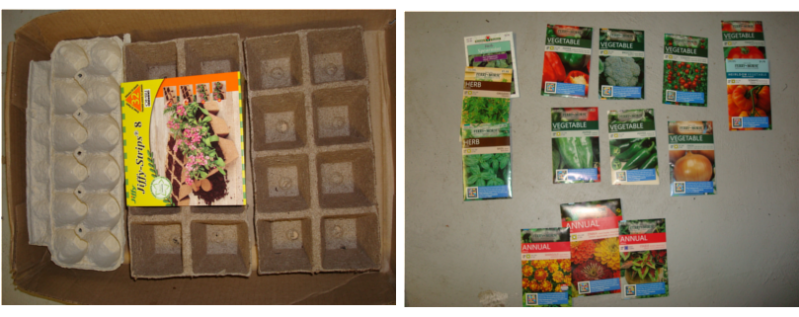
enginesseeds - Around mid-March, purchase some peat pots or reuse old egg cartons (not the plastic/styrofoam kind), potting mix, any seeds you want but don't already have, and some plant markers. Dampen the potting mix, fill the peat pots to the top, then follow the instructions for planting each seed type at the appropriate depth (the packet tells you). Do a few peat pots of each type of seed because you are guaranteed to have some failures, or at least a few plants that aren't exactly D-1 superstars. Water them all when you're done and use plant markers to note the names and date that you planted them. A few notes...Peat pots are preferable to the little plastic ones because they decompose, meaning you can plant the entire thing without having to remove the seedling from it's container later. Use potting mix, not garden soil. Most garden soil isn't naturally nutrient rich, but potting mix is specially balanced specifically for seed starting. More deets in the books about that. Also, instead of buying pre-labled or plastic plant markers, you could just use popsicle sticks which might be cheaper (or free). (The plastic ones I used that I labeled withsupposedlypermanent marker all ended up fading in the sun anyway, so I probably wouldn't recommend my method.) - Mr. Golden Sun - Put them in the sunniest spot you can find, preferably a south facing window. If you have to fudge it with a west or east facing window (or perhaps you have tall buildings very close by that prevent you from maximizing all your south facing sun), try putting a sheet of foil underneath your peat pots so it overlaps around the sides, absorbing more of the warmth. Plants need lots of light and warmth to grow. If you notice this seems to be frying your little plants (I didn't have any problems with it, but you never know), get rid of it. You can also try empty 2 liter bottles cut in half to make covers, or buy a rectangular plastic cover, either option would help retain heat and humidity, which the baby plants love. Obviously, you can use grow lights or fancy hydroponic systems, but those can cost a lot of money and waste a lot of energy. If environmental impact is one of the reasons you're growing your own seeds, these methods might defeat the purpose of your efforts.
- Water - Yep. It's really important. Your seedlings' soil should always be damp. Never let them dry out. If that means watering them twice a day, so be it, but they won't grow without H2O. Don't drown them, however. The soil should be damp, not soggy.
- Thin your plants - If you planted a few seeds in each peat pot and all of them sprouted, your baby plants might be getting a little crowded. If this is happening, pinch off a couple. This is calling 'thinning' your plants. It may seem counterintuitive, especially because the plants are so small and fragile looking, but it actually encourages growth. The couple times I did it, some of my seedlings were nearly an inch taller by the next day - no joke.
- Harden off - Not to be confused with 'hard-on', sickos. Harden off. The week before you are ready to plant (and any chance of frost is clear, of course) you gradually transition your plants from their indoor environment to their new outdoor environment. They haven't been exposed to wind, pests, heavy precipitation, or intense heat yet, so this process helps them adapt and become a little stronger before you put them in the ground. Start with a few hours in the shade and work up to a full day in the sun by the end of the week.
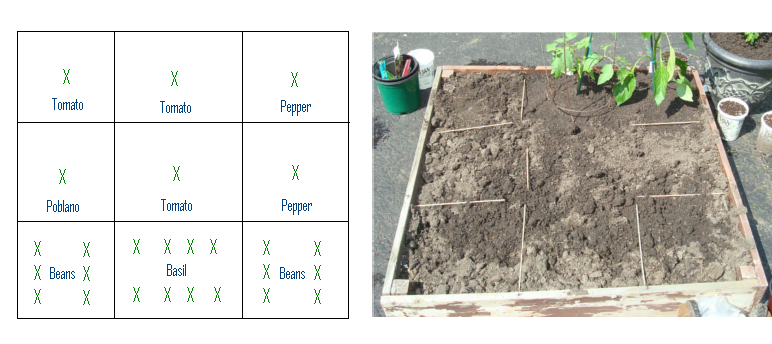
- Plot your plot - Sometime between deciding what you will plant and actually putting your seedlings in the ground, figure out where will put your plants. This means assessing your garden bed, plotting your square foot box, or determining what size containers you will need (they should accommodate your plants at their biggest size). This should also involve a sunny spot, with around 8 hours of sun per day for most veggies. Determine your plant placement based off each plant's growing requirements (on the seed packet or plant marker if you bought nursery plants). Also consider which plants are good 'companions', meaning they are mutual beneficial in enhancing flavor and preventing pests. This is known as companion planting, which is a method I used in my square foot box. For example, tomatoes and basil are mutually beneficial - perhaps ironic because they also taste delicious together. Sketch all this out so you don't forget. It doesn't need to be fancy. Or, if you're a technology geek, then maybe it does. They make online garden plotting gadgets just for you. You can even find pre-made plans online or in books (see the refs section) that do all the
dirty work'research' for you. - Planting day - Aka seedling graduation day. Prep your soil - whether it be more potting mix in containers, soil in a bed, or soil in a square foot box - by mixing in some compost for nutrients and any other amendments you might have decided on. You can also use other natural additives for 'fertilizer,' such as dried egg shells or coffee grounds, at this time. But research what is appropriate for your veggies. Make sure the soil isn't completely dry. Insert plants at their appropriate depth and spacing requirements, per the seed packets or markers (if store bought). Water thoroughly.
- Water - Again. And again and again. The dirt should always be damp, but never soggy. If you aren't sure, stick your finger in it about halfway. If it feels dry, it needs water. Plants in containers, hanging baskets or otherwise in a location in which there is a lot of airflow underneath the pot will need more water than plants in square foot boxes or beds. The added airflow causes the roots to dry out quickly, so they might even need water twice per day. Tell tale signs are usually browning leaves. The best times to water are early in the morning or around dusk (the best, I think) because the plants have maximum time to absorb the water before it's sucked up by the heat/sun again. If you are really struggling in the hydration department, you can try covering the top of the soil with peat moss (thanks for the reminder Christin!) or mulch. Or for container gardens, consider planting in a self watering container, such as an Earth Box. They are expensive to buy, but you can DIY your own version...something I actually started doing and never finished, so that will be a blog post for next spring.
- Watch for pests - Check the leaves and any appearing 'fruit' regularly to see if pests are getting at your plants, and try to identify them. If holes appear all over your leaves, that is one of the most common signs. Some natural remedies that generally won't harm plants include sprinkling cayenne pepper on leaves or around the base of the plant (or making a spray out of it) or using diatomaceous earth, which is natural powder that kills most pests (but can also kill good ones if you aren't careful or use it too liberally). If you tried companion planting, hopefully pest problems will be unlikely. However, if you have to deal with them, there are many other options beyond what I mentioned that don't involve chemicals. The books I reference are especially helpful in this area.
- Harvest - Yum. The best part. Don't forget to pinch of browning leaves as they appear, which can often encourage new growth in it's place.
This is clearly not comprehensive advice, but hopefully gives you a few tips that worked for me, as well as some new tricks to make growing your own organic food easier for you. Or I guess semi-organic if some of the seeds weren't labeled as 'organic' to begin with. But you get the point. I really encourage you to check out the books I reference because they have such a wealth of knowledge and options, even for those with the tiniest spaces. Don't forget, you can grow upward too - vertical gardening!
Ok, so I failed at keeping this short. Like, really failed. But maybe it was useful at least...?
*I wasn't paid/perked in any way for offering up the references I listed - I only WISH I could be cool enough to get offers like that. They are just what I found to be the most helpful for me.










 Posts
Posts

